Abstract
When ASTM standard E 2 was published in 1917, ASTM Committee E-4 on Metallography’s first standard, it described the planimetric method for measuring grain size based upon publications by Zay Jeffries, a founding member of E4; but, E 2 only briefly mentioned the intercept method developed in Germany in an appendix at the end of the standard. The intercept method suggested by Heyn in 1903 [1] is considerably faster to perform manually which has made it popular, despite the fact that there is no direct mathematical connection between the mean lineal intercept length and G. Both straight lines and circles have been used as templates, plus other shapes.
The Heyn Intercept Method – Modified by Abrams
In the 1974 revision of E 112 by Halle Abrams, he introduced the three-concentric circle test grid and a more formal methodology for performing intercept grain size measurements. His idea [2, 3] was that the total circumference of the three circles was 500 mm and he suggested adjusting the magnification so that, on average, about 100 grain boundary intersections, P, or grain interceptions, N, would be obtained. Then, five random applications of the three-circle grid would yield ~500 N or P hits which would give ~10% relative accuracy. This strategy was verified in a subsequent interlaboratory round-robin [4]. However, counting errors seemed to be greater when each placement yielded ~100 counts compared to a magnification that yielded ~50 counts. So, the standard was modified to recommend using a magnification that yielded ~50 counts per placement. The goal was still to get ~500 total counts. Ten randomly chosen fields would give a more representative estimate of the grain size than five fields.
To do the intercept method, one counts either grain boundary intersections, P, or grains intercepted, N, by the circles. For a single phase structure, it is easier to do P counts. For a two-phase structure, one must do N counts. For a single phase grain structure P = N and either count can be made. The P or N count is divided by the true line length, LT, which is the line length divided by the magnification, L/M. This yields PL or NL, the number of intersections per unit length or the number of interceptions per unit length. The reciprocal of PL or NL is the mean lineal intercept length, L3, which may be designated as l. The mean lineal intercept is related to G by the following empirical equation:
G = (-6.6457 log L3) – 3.298 (1)
Experimental Program
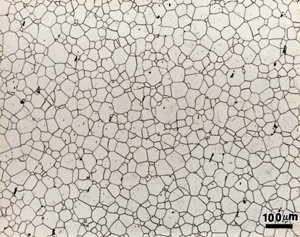
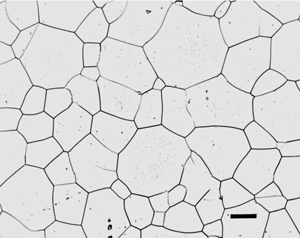
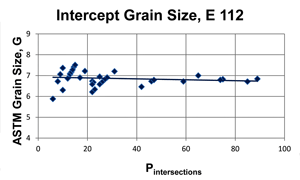
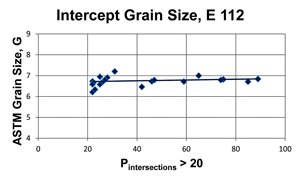
Two images of a ferritic stainless steel, etched electrolytically with aqueous 60% nitric acid, were used for the experiments. The magnifications were 100 and 400X and they were located at the same area. These images were printed on paper with different sizes and circles or rectangles of various sizes were superimposed over the images to generate a wide variation in counts. The grain size images at 100X and 400X are shown in Figure 1. For the 40 different test circles and grain size depictions used to vary the intercept counts, the intercept method of E 112 (using one test circle per image rather than the usual three concentric test circles) gave results identical to the planimetric measurements reported previously, as shown in Figure 2. The linear trend line shows a slight upward slope with decreasing Pintersections. For the same nine test circles that yielded the highest counts, the mean grain size is ~6.76 (6.759 ± 0.108 for the nine highest count values). Figure 3 shows the effect of eliminating Pinside values below 20. The mean grain size for measurements >20 is also ~6.76 (6.756 ± 0.10 for the 23 values >20). Note that the trend line slows a slight downward trend as the count decreases, the reverse of Figure 2 for all data.
Conclusions
The intercept method, using only a single test circle (rather than the three concentric test circles recommended in E 112) yielded an estimate of the grain size of 6.76 for both the 9 highest intercept counts with ≥ 42 intersected grains, and for the 23 highest intercept counts with >20 intersected grains per test circle application. These test results are statistically identical to the previously reported measurements made using the Jeffries planimetric grain size measurements using the same test circles .
References
- E. Heyn, The Metallographist, Vol. 5, 1903, pp. 39-64.
- H. Abrams, “Grain Size Measurements by the Intercept Method,”Metallography, Vol. 4, February 1971, pp. 59-78.
- H. Abrams, “Practical Applications of Quantitative Metallography,” Stereology and Quantitative Metallography, ASTM STP 504, 1972, pp. 138-182.
- G.F. Vander Voort, “Precision and Reproducibility of Quantitative Measurements,” Quantitative Microscopy and Image Analysis, ASM International, Materials Park, OH, 1994, pp. 21-34.
George Vander Voort has a background in physical, process and mechanical metallurgy and has been performing metallographic studies for 45 years. He is a long-time member of ASTM Committee E-4 on metallography and has published extensively in metallography and failure analysis. He regularly teaches MEI courses for ASM International and is now doing webinars. He is a consultant for Struers Inc. and will be teaching courses soon for them. He can be reached at 1-847-623-7648, EMAIL: georgevandervoort@yahoo.com and through his web site: www.georgevandervoort.com
To View a listing of all George’s articles please click here
Read George Vander Voort’s Biography


