Abstract
Compared to many other metals and alloys and many other materials, such as carbides, ceramics and sintered carbides, aluminum and its alloys are low in strength and hardness. Aluminum is a soft, silvery metal with a face-centered cubic crystal structure, a hallmark of ductile metals. Its softness makes it somewhat difficult to prepare but the alloy is not sensitive to problems that plague preparation of magnesium and titanium, that is, a sensitivity to mechanical deformation that generates mechanical twins or Neumann bands. Aluminum, like chromium, niobium and titanium, is very corrosion resistant and a thin, transparent oxide film will form on a freshly polished surface. This film is responsible for its good corrosion resistance, but also makes etching difficult. Aluminum alloys contain a rather high content of intermetallic precipitates that contribute little to improving the alloys and may be detrimental. Contemporary four or five step preparation procedures are given for preparing aluminum and its alloys. Results are also shown for revealing grain size with Weck’s reagent, a useful alternative to anodizing.
Introduction
Examination of the microstructure of aluminum and its alloys requires a well-executed chain of steps carefully developed based upon scientific understanding and practical experience. In general, there are a series of steps required to prepare specimens: sectioning, mounting, grinding and polishing. In most cases, sectioning is required to obtain a small piece for examination. In a few cases, such as examination of fasteners, sectioning may not always be needed. Mounting, in some cases, may not be needed. After grinding and polishing, it is good practice to examine the surfaces before etching. For examination of intermetallic phases, it is common practice to etch with dilute aqueous HF solutions; a 0.5% concentration is very commonly used. This improves the image contrast and reveals little besides the intermetallics. Other etchants are used to detect segregation or cold work or reveal grain size. For some alloys, it is quite difficult to reveal the grain boundaries. Anodizing procedures are very useful for revealing grain size but the structure must be revealed using cross-polarized light aided by a sensitive tint (full wave) plate. These procedures are discussed in the following sections.
 |
 |
|
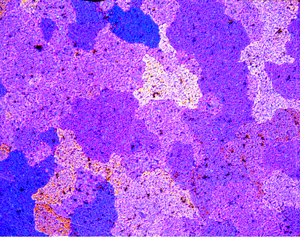
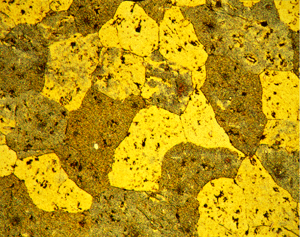
Figures 1 (left) and 2 (right): Grain structure of 2011-O (left) and 2011-T3 (right) revealed using Weck’s reagent (magnifications are 500 and 200X, respectively).
|
|
Sectioning
In theory and in practice, any standard cutting technique can be, and is used, to section aluminum and its alloys. However, the damage produced at the cut surface does vary substantially with different procedures. All cutting operations produce damage, but the degree of damage and depth of damage does vary with the methods chosen. Use of a metallographic abrasive cut-off saw produces relatively smooth surfaces with minor damage. Nevertheless, one must choose the correct wheel, use proper cooling, control feed and pressure, etc., to get best results. Dry cutting should never be performed. The thinner the wheel, the lower the damage. The larger the wheel diameter, the greater the minimum thicknesses that can be utilized without serious wheel breakage problems. A precision saw uses relatively small diameter blades and they can be made quite thin; these thin blades produce very little damage and yield excellent surface finishes. In all cases, cutting must not produce excessive temperatures that may alter the microstructure and hardness.
Mounting
In general, thermosetting resins are used more commonly than thermoplastic resins as they yield better edge retention and are more chemically inert. Introduction of compression mounting epoxy-based resins with a filler, such as DuraFast resin, has solved the edge retention problem – when properly used. Excellent edge retention is only achieved when a series of steps are properly performed. Epoxy resins are widely used for a variety of reasons, although they are more expensive than acrylics or polyesters. Epoxies will physically adhere to specimens and they can be drawn into cracks and pores, particularly if vacuum impregnation is used. A low viscosity epoxy resin is required for best results.
 |
 |
|
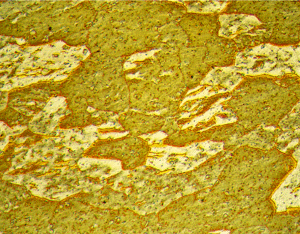
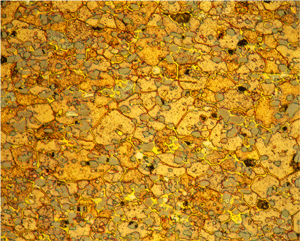
Figures 3 (left) and 4 (right): Grain structure of 3003 (left) and 4032-T6 (right) revealed using Weck’s reagent (magnifications are 500X).
|
|
Grinding
Mounted or unmounted specimens can be ground either manually (i.e., by hand) or using automated devices. Silicon carbide has been the generally preferred grinding abrasive for aluminum and its alloys and it is quite effective. In the past, specimens were ground through a series of five or more sheets of SiC with increasingly finer abrasive sizes. In the new methods, only one SiC abrasive size is employed. If the specimens have been sectioned with an abrasive wheel designed for metallographic sectioning of aluminum, then the damage introduced is minimal and grinding can commence with a relatively fine grit size, at least 240 (P280) or 320-grit (P400). The surface is water-cooled and the platen is rotated at 240-300 rpm. Loads are slightly lower for Al than for steel, 5 lbs (22N) per specimen, rather than 6 lbs (27N).
Polishing
Polishing is performed today using one or more diamond abrasive sizes followed by final polishing with colloidal silica. MgO is no longer used for final polishing, as it is difficult to use, gives relatively poor results, and its use requires special cloth cleaning procedures due to the formation of magnesium carbonates after the cloth dries (which ruins the cloth). Colloidal silica also has some problems with it use. First, always wash off the cloth thoroughly after use. If the suspension evaporates, the silica will crystallize and ruin the cloth. Colloidal silica is harder to clean off the polished surface than other abrasives. Scrub the surface with a tuff of cotton soaked in a soap solution, rinse with water and dry in the usual manner (displace the water with ethanol and blow dry with warm air). An easy way to simplify cleaning of your specimens is as follows. If you are using an automated polisher, stop adding colloidal silica about 20 s left in the polishing cycle. Then, with about 10 s left, turn the water on and flush the abrasive off the surface. Then, cleaning will be much easier. Colloidal silica is also sold with additives to minimize the crystallization problem. These are often referred to as “non-freezing” suspensions. These are somewhat easier to work with and produce equivalent results.
 |
 |
|
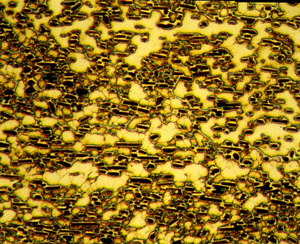
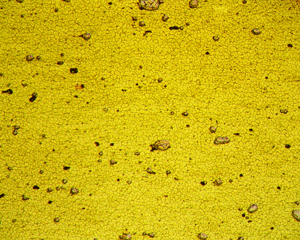
Figures 5 (left) and 6 (right): Grain structure of 4147 (left) and 5083-H321 (right) revealed using Weck’s reagent (magnifications are 500X).
|
|
The following “contemporary” practice works very well and has been used to prepare all sorts of cast and wrought Al grades. Specimens to be illustrated were mounted in either a compression mounting epoxy resin, such as DuraFast, or in a cast epoxy resin, such as EpoFix. The latter is used for corrosion specimens and for specimens aged at temperatures below the molding temperature for compression mounting, 150-170 ºC. Six specimens are placed in a holder for an 8-inch (200-mm), 10-inch (250-mm) or 12-inch (300-mm) diameter grinder/polisher, such as the Tegramin. The head was always positioned so that the outer edge of the holder, when it rotates over the platen, runs out slightly over the edge of the grinding paper or polishing cloth. This minimizes differential grinding effects and enhances edge retention.
The preparation steps are:
- The 6 specimens are ground using 240-grit waterproof SiC paper, at 240-300 rpm, 5 lb. (22N) applied load per specimen, with complementary rotation (holder and platen both rotate in the same direction), until all of the 6 surfaces are co-planar and the cutting damage is removed. One or two sheets of paper are needed. The specimens and the holder are rinsed and dried.
- 9-µm diamond paste (DP-Paste P) is applied to an MD-Dur silk cloth. Green lubricant fluid is used to wet the surface. The 6 specimens are polished for 5 minutes at 120-150 rpm, 5 lb. load per specimen, using complementary rotation direction. After two minutes, the surface is refreshed by a squirt of 9-µm DP-Suspension P polycrystalline diamond slurry. This does not require use of a separate extender/lubricant. A squirt is added about every 30 seconds, until the cycle is completed. The specimens and holder are washed under running water with a soap solution, rinsed with water, then ethanol, and dried.
- This step used 3-µm diamond on an MD-Dac or MD-Sat acetate pad in the same manner as the 9-µm diamond except that this step lasts 3 minutes.
- This step is optional, depending upon the degree of difficulty in preparing the particular grade. It uses 1-µm diamond on an MD-Dac or MD-Sat pad in the same manner as steps 2 and 3, except that this step lasts 2 minutes.
- The final step uses OP-S or OP-U colloidal silica on an MD-Floc or MD-Chem pad for 90-120s, at 120-150 rpm, and 5 lb. per specimen, using contra rotation (holder rotates in direction opposite to the platen – use contra only if the head speed is <100 rpm). Cleaning is performed as described in step 2.
Etching
With nearly all metals and materials, and aluminum is no exception, it is always best to examine specimens after preparation, prior to etching. Some intermetallic phases are best identified in the as-polished condition, such as Si and Mg2Si. Fine cracks, voids, or cracks and voids associated with intermetallic particles may be easier to see before etching. Numerous etchants [1, 2] have been developed for revealing the microstructure of aluminum and its alloys. General-purpose etchants are used by swabbing or by immersion. Swabbing is conducting using cotton saturated with the reagent. Hold the specimen with tongs using one hand and swab with cotton, held with tongs, in the other hand. Some metallographers wrap cotton around a small piece of wood, like a “popsicle” stick, others use “Q-tips”. However, for best results, use a good grade of surgical cotton. Cosmetic cotton puffs can contain impurity fragments that may interfere with etching, or they may disintegrate readily in the strong etchants required for aluminum. Immersion is simpler. The specimen is placed in a small beaker containing about 100mL of the etchant, polishing face up, using tongs. Gently swirl the etchant or use the tongs to provide agitation. This promotes uniform etching. Surfaces must be properly cleaned before etching, or etching results will be impaired. Etching is halted when the proper degree of surface dulling is produced. The specimen is removed from the beaker, or swabbing is halted, and rinsed with running water. The specimen is then rinsed with ethanol and blown dry with warm air.
 |
 |
|
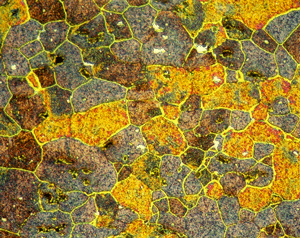
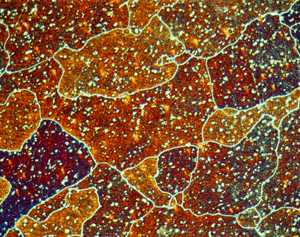
Figures 7 (left) and 8 (right): Grain structure of 6013-T8 (left) and 6061-T6511 (right) revealed using Weck’s reagent (magnifications are 500 and 200X, respectively).
|
|
For many metals and alloys, there is little difference between specimens etched by swabbing vs. immersion. Generally, for metals that demonstrate good corrosion resistance by formation of a thin oxide film, swabbing produces more uniform results than immersion. Aluminum, of course, is in this category. However, for some aluminum alloys, etching by immersion with Keller’s reagents will produce minor grain contrast effects, while if swabbing is used, a “flat” etch results. Color etchants are always used by immersion as swabbing prevents film formation or will smear any film that forms.
Revealing the grain boundaries in aluminum alloys can be difficult, particularly for some alloys and heat treatment conditions. As a rule, the lower alloy content grades require anodizing to reveal the grain structure with cross-polarized light. The more highly alloyed grades can be etched successfully with either Keller’s reagent, the Graft-Sargent reagent, aqueous 10% phosphoric acid (50C) or a mix of 2g NaOH, 5g NaF and 93ml water (immerse 2-3 minutes).
Anodizing is an electrolytic etching procedure that is claimed to deposit a film on the specimen surface that reveals the grain structure when viewed with crossed polarized light. It is the most widely successful etching technique for revealing grain structures in aluminum and its alloys, but it does not work on all alloys. Of the published anodizing solutions and procedures for aluminum, Barker’s reagent is the most popular.
After anodizing, the specimen must be viewed with polarized light; bright-field illumination reveals nothing of the grain structure (because an interference film is not produced). In crossed-polarized light, the grains are seen in shades of gray from white to black. If a sensitive tint plate is inserted, the grains are colored. The variation in gray level or color depends upon the crystal orientation of the grains.
Color etchants, also known as tint etchants, have not been widely used with aluminum alloys. However, the writers have had considerable success with one developed by Weck that contains 100 mL water, 4 g potassium permanganate and 1 g sodium hydroxide. The specimen is immersed in the solution and gently agitated until the surface is colored, usually in about 15-20 seconds. Removed the specimen, rinse in water, then alcohol, and blow dry. Color can be enhanced by examination with crossed polarized light and sensitive tint.
 |
 |
|
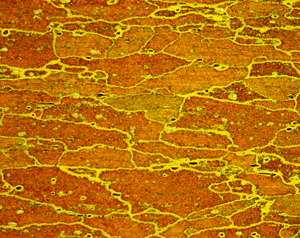
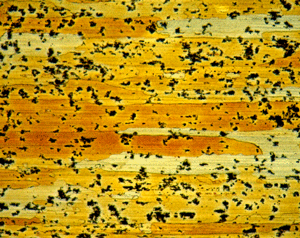
Figures 9 (left) and 10 (right): Grain structure of 6262-T9 (left) and 7075-T651 (right) using Weck’s reagent (both at 200X). 7075-T651 was etched for 60 s.
|
|
Microstructures
A number of specimens were etched with the following reagents to reveal the grain structure: Keller’s reagent, the caustic NaF reagent, the Graff-Sargent reagent, and Weck’s reagent. The tests showed that Weck’s revealed the grain structure in almost every instance. For 2011-O, only Weck’s produced a rendering of the grains, Figure 1. For 2011-T3, all four revealed the grain structure, but the Graff-Sargent etch appeared to bring up cell boundaries that were much finer in size than the grains. Figure 2. Type 3003 is a very difficult alloy to reveal grain size. Only Weck’s reagent showed the grains, although the results were not as good as desired, Figure 3. Results for 4032-T6 showed that Keller’s and Weck’s could bring up the grain structure, Figure 4. 4147 was quite difficult and again Weck’s was the only etch that revealed grains, although the results were not perfect, Figure 5. 5083-H321 was tried and Weck’s faintly revealed the grain structure, while none of the others revealed any boundaries, Figure 6. 6013-T8 produced good results, except for the Graff-Sargent etch. Results with Weck’s reagent are shown in Figure 7. 6061-T6511 was successfully etched by the caustic NaF reagent and by Weck’s, Figure 8. 6262-T9 was also successfully etched by the caustic NaF reagent and by Weck’s, Figure 9. All four reagents revealed the grain structure of 7075-T651 successfully. Figure 10 shows the results after using Weck’s reagent. All micrographs were taken in polarized light plus sensitive tint.
Conclusions
Aluminum and its alloys can be prepared using a straightforward four or five step procedure. Always section specimens with an abrasive wheel developed for metallography to minimize the damage at the cut. Then, start grinding with the finest possible abrasive size that will remove the sectioning damage and get all of the specimens in the holder to the same plane in a reasonable amount of time. Contemporary procedures employ napless surfaces for the diamond polishing steps, although a napped surface is acceptable for the final abrasive. Weck’s tint etch was found to be very useful for revealing the grain structure of wrought alloys. It was more successful than any of the standard etchants. It offers an alternative to anodizing which requires electrolytic etching.
References
- G.F. Vander Voort, Metallography: Principles and Practice, McGraw-Hill, NY, 1984 and ASM International, Materials Park, Ohio, 1999.
- M. Warmuzek, “Metallographic Techniques for Aluminum and Its Alloys,” ASM Handbook, Vol. 9, Metallography and Microstructure, ASM International, Materials Park, OH, 2004, pp. 711-751.
George Vander Voort has a background in physical, process and mechanical metallurgy and has been performing metallographic studies for 45 years. He is a long-time member of ASTM Committee E-4 on metallography and has published extensively in metallography and failure analysis. He regularly teaches MEI courses for ASM International and is now doing webinars. He is a consultant for Struers Inc. and will be teaching courses soon for them. He can be reached at 1-847-623-7648, EMAIL: georgevandervoort@yahoo (DOT) com and through his web site: www.georgevandervoort.com
To View a listing of all George’s articles please click here
Read George Vander Voort’s Biography
