Abstract
The two previous articles covered methods for measuring grain size that have been incorporated into ASTM E112 for many years. The Jeffries planimetric method was introduced into standard E2 in 1917 – Committee E-4’s first standard. Zay Jeffries was a founding member of the committee and had published several articles about the method, which he learned from his PhD advisor, Albert Sauveur, the dean of American metallographers. This method is precise, but a bit slow for production work because the grains must be marked off as they are counted manually. The method, however, can be modified for image analysis work. The second method was the Heyn intercept method, which was developed in Germany in 1903 and was mentioned briefly in ASTM E2, but not described in detail, when published in 1917. The intercept method was later modified by John Hilliard and then by Halle Abrams. The Abrams three-circle intercept method is used in production work as the intercepts (or intersections) do not need to be marked off on a template when counted. But, the writer recently has introduced the Saltykov rectangle to E112 as it can yield accurate grain size measurements down to fewer counts per field than the other two methods. As with the Jeffries method, the Saltykov method does require marking of the grains for accurate counting, although it, too, can be used by image analysis.
The Saltykov Planimetric Method Using Rectangles
Saltykov [1] suggested using a rectangular (a square may also be used) for the test grid, rather than a circle, to minimize bias in grain counts as the number of grains inside the test figure, ninside, decreases. The grains that intersect the four corners are ignored in the count of nintersected. As there are four corners, and each grain intersecting the corners is considered to be 1/4th inside the rectangle, Saltykov adds one to the quantity:
NA = f [ninside + 0.5nintersected +1] (1)
Alternatively, the grains at the four corners could be counted, and weighed as half inside and half outside the rectangle, but then one must subtract 1 from the total (modifying equation 1) to get the same NA value. The purpose of the experimental work reported here is to determine how the number of counts inside the test figure, whether it is a circle or a rectangle, affects the calculated grain size, G.
NA is the number of grains per mm2 at 1X and f is similar to the Jeffries multiplier:
f = M2/A (2)
where M is the magnification and A is the area of the rectangle in sq. mm.
The ASTM grain size number is calculated from:
G = 3.321928 LogNA – 2.954 (3)
G is rounded off to the nearest tenth value. In practice, more than one field must be evaluated to obtain a good estimate of G.
Experimental Program
Two images of a ferritic stainless steel, etched electrolytically with aqueous 60% nitric acid, were used for the experiments. The magnifications were 100 and 400X and they were located at the same area. These images were printed on paper with different sizes and rectangles of various size were superimposed over the images to generate a wide variation in counts. The grain structure images were shown in the previous articles mentioned above.
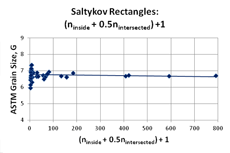
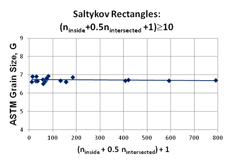
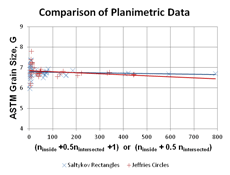
Figure 1 shows the planimetric grain size measurements using rectangular test grids and Saltykov’s counting approach (equation 1). This is based upon 43 measurements using rectangles of varying size where [ninside + 0.5nintersected +1] varied from 2.5 to 790.5. Note that the linear trend line is nearly flat over the full range. The mean grain size for the eight highest measurements (>100 counts) was 6.7 (6.7 ± 0.06). For 17 measurements with counts >50, the mean grain size, G was ~6.72 (6.718 ± 0.052). For 20 measurements with counts ≥ 29, the mean grain size was also ~6.72 (6.722 ± 0.049). Figure 2 shows a plot of the planimetric grain size using rectangles and Saltykov’s procedure when [ninside + 0.5nintersected +1] is >10 (23 measurements). Note that the linear trend line is flat across the graph. The mean grain size for counts >10 is ~6.74 (6.737 ± 0.052). Figure 3 shows a comparison of the results for the planimetric method with the Jeffries test circles and for the Saltykov approach using rectangles. Over the data range, the agreement is excellent.
 |
|
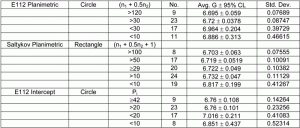
Table 1: Summary of the Test Results.
Note; n1 = ninside and n2 = nintercepted
|
Table 1 summarizes the test results using the planimetric method of Jeffries, as defined in E 112, the Saltykov planimetric method using rectangles and his modified counting method, and the E 112 intercept method of Heyn using the Jeffries circle, that is, a single test circle, rather than the Abrams three concentric circle method (which would yield higher counts per field). This shows that the Saltykov method yields data equivalent to the Jeffries method, with lower 95% confidence values and better G estimates at lower counts. The Heyn intercept method yielded slightly higher estimates of G and higher 95% confidence limits, although this is affected by the lower count rates due to the use of only one test circle.
Conclusions
The planimetric grain size estimates using rectangles yielded the same grain size, G = 6.7, for the 8 highest counts (>100 inside and intersecting). When that number was lowered to ≥50, the estimate of G was 6.72 and when lowered to ≥10, G was 6.73 – very consistent results. The use of rectangles produced the best estimate of the grain size at low counts. The difference in the grain size estimate using low counts with either a circle or rectangle is quite small. Intercept counts, although none exceeded 89 intersected grain boundaries per placement, yielded slightly higher estimates of the mean grain size. However, the single test circle does not sample as many grains using the intercept method as when using the planimetric method. This shows the need to use several concentric test circles per field, as with the Abrams three-circle intercept method. Bias was not detected at low counts of the number of grains inside the test circle plus half of the number of grains intersecting the test circle. Instead, only data scatter was detected.
Reference
1. S.A. Saltykov, Steremetricheskaya Metallograpfiya (Stereometric Metallography), 2nd revised and supplemented edition, Metallurgizdat, Moscow, 1958, 444 pgs.
George Vander Voort has a background in physical, process and mechanical metallurgy and has been performing metallographic studies for 45 years. He is a long-time member of ASTM Committee E-4 on metallography and has published extensively in metallography and failure analysis. He regularly teaches MEI courses for ASM International and is now doing webinars. He is a consultant for Struers Inc. and will be teaching courses soon for them. He can be reached at 1-847-623-7648, EMAIL: georgevandervoort@yahoo.com and through his web site: www.georgevandervoort.com
To View a listing of all George’s articles please click here
Read George Vander Voort’s Biography


