Abstract
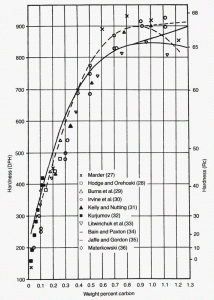 |
| Figure 1: Summary of extensive as-quenched hardness data from the literature for Fe-C alloys and steels by Krauss [2]. |
Formation of martensite in fine-grained steels is probably the most common goal in heat treatment of components. The carbon content of the parent austenite phase determines whether lath (low-carbon) or plate (high-carbon) martensite, or mixtures of the two will be produced, assuming the quench rate and steel hardenability are adequate for full hardening. Lath martensite produces higher toughness and ductility, but lower strengths, while plate martensite produces much higher strength, but may be rather brittle and non-ductile. For a given alloy content, as the carbon content of the austenite increases, the martensite start, Ms, temperature and the martensite finish, Mf, temperature will be depressed which results in incomplete conversion of austenite to martensite. When this happens retained austenite, which may be either extremely detrimental or desirable under certain conditions, is observed. The amount of retained austenite present depends upon the amount of carbon that can be dissolved in the parent austenite phase and the magnitude of the suppression of the Ms and Mf temperatures. This paper examines the conditions under which austenite is retained and the problems associated with it presence, with detecting it and with measuring it.
Introduction
In the early days of steel making, the heat treatment of steels was certainly an art as the science behind what was happening was just starting to be understood by the 1930s. Prior to the work of McQuaid and Ehn in the 1930s the carburizing of steel and its subsequent heat treatment was very difficult as maintaining a fine grain size after carburizing was not understood. Coarse-grained hardened carburized cases would fracture intergranularly the first time the part was placed into service. They discovered that small additions of aluminum would keep the grain size fine after a long exposure, generally 8 to 10 h, at the carburizing temperature. Prior to that, coarse prior-austenite grain structures would be observed in the carburized case that would initiate brittle intergranular fractures at minor loads. Next, Grossman and Bain developed the theory of hardenability where the ideal critical diameter, DI, could be calculated from steel composition and knowledge of the prior-austenite grain size. Then, the DI could be used to estimate the as-quenched hardness profile of a uniformly shaped bar subjected to a known quench media and quench rate.
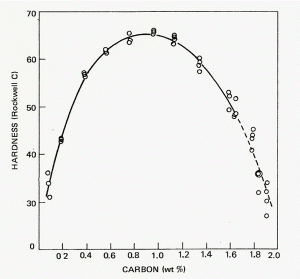 |
| Figure 2: As-quenched of brine quenched Fe-C alloys up to nearly 2 wt. % by Litwinchuk et al. [3]. |
Isothermal time-temperature-transformation diagrams (known as IT or TTT diagrams; sometimes less appropriately called S or C curves) were developed next making it easier to identify diffusion-controlled transformation structures, particularly the poorly understood microstructures of upper and lower bainite. But, an IT diagram, while it is helpful in understanding microstructures and in developing annealing cycles, is not particularly useful for understanding quenched and tempered microstructures. This problem was solved by developing continuous cooling transformation, CCT, diagrams. Some years before the writer joined the Homer Research Laboratories of Bethlehem Steel, they had developed CCT diagrams using the arrested-Jominy bar method – a rather painful process indeed. Dilatometer-based CCT diagrams were far easier to develop and in less time, but this equipment came later.
Development of the transmission electron microscope (TEM) utilizing the thin-foil procedure produced a far deeper understanding of the fine details of steel microstructures because much of the fine details of these microstructural constituents were well beyond the resolution of the light optical microscope (LOM). The development of IT and CCT diagrams had shown that martensite began transforming at temperatures relative to the composition of the austenite, with its carbon content being most important. Problems due to excessive retained austenite had plagued the tool steel industry since the late 19th century. X-ray diffraction had been the only practical and exact tool for the measurement of retained austenite, but XRD cannot produce images of this, or any microstructure. LOM could not image retained austenite until it was at least present in the 12-15% range. TEM thin foils could detect and image retained austenite even at levels under 2% with careful use of dark field illumination, but it was not useful for quantifying the amount present. The morphology of the martensite makes it difficult to distinguish small particles of retained austenite within the complex plate martensite patterns. With low-carbon lath martensite, thin films of retained austenite could be seen with very careful TEM dark field work, but again this was very difficult work.
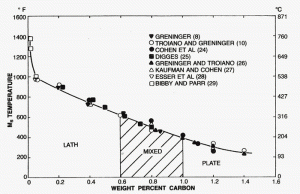 |
| Figure 3: Graph by Marder and Krauss showing the relationship between carbon content, martensite type and Ms temperature [4]. |
In the tool steel industry, excessive retained austenite is universally considered to be highly detrimental and is the cause of many service failures. Exactly what constitutes as being “excessive” is difficult to define as what is found to be excessive will vary with the grade and application. Relatively low-carbon (for tool steels) 5% Cr hot work die steels such as H11 and H13 have been used for years as guage blocks. Any dimensional change with time must be avoided. Consequently, these steels are triple tempered at a relatively high temperature where retained austenite will be converted to either fresh martensite or bainite and they will be tempered with the next tempering cycle. In other applications, any observable (>12-15%) retained austenite using the light microscope is highly detrimental. Service stresses (strain rates can be very high) will convert the retained austenite, even if it has become stabilized with time, on the first service impact load. Because the carbon content of the retained austenite is high, the martensite that forms is highly tetragonal (high c/a lattice ratio) and the resulting expansion cracks the steel as the matrix is not ductile enough to tolerate the expansion stresses. On the other hand, with carburized gears, only a very thin layer at the surface is carburized and may contain 20-25% retained austenite. The bulk of the gear is a highly ductile (certainly when compared to a hardened tool steel) low-carbon alloy steel. Gears are usually not impact loaded like a tool steel die, so the service stresses are much lower and the retained austenite usually does not transform substantially during service. If the retained austenite did transform, the steel around it and below the case is ductile enough to accommodate the strains without fracture. Retained austenite does become stable with time and some will transform to martensite at room temperature. Samuels [1] states that up to 5% of the austenite present after quenching and low temperature tempering (<200 C) will transform to martensite soon after quenching or over a period of some months.
Influence of Carbon Content of the Austenite
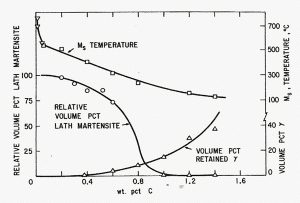 |
| Figure 10: Influence of carbon content of the austenite on the percentages of lath (or plate) martensite, Ms temperature and percentage of retained austenite [5]. |
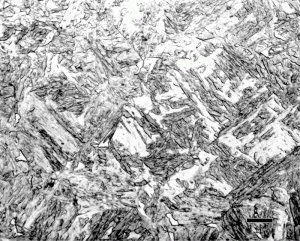
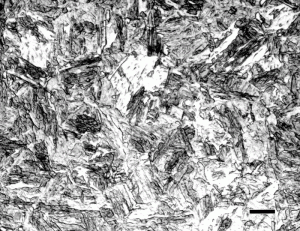
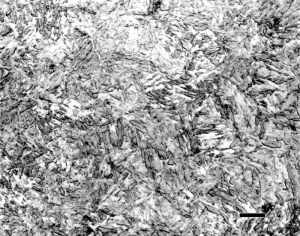
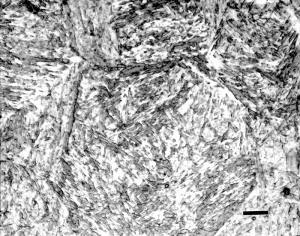
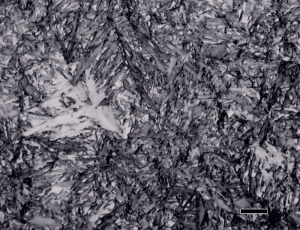
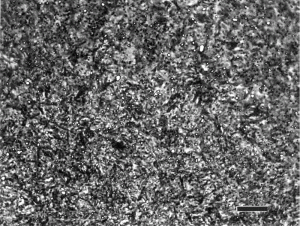
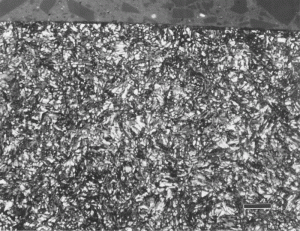
With the development of hardenability concepts, a number of investigators demonstrated that the hardness of as-quenched martensite increases in a relatively linear fashion from about 0.05 to 0.5 wt. % carbon. Figure 1 shows data from a number of investigators summarized by Krauss [2]. Note that when the carbon content of the austenite is >0.8%, the as-quenched hardness drops. This is due to the presence of retained austenite which is much softer than plate martensite. Litwinchuk et al. [3] expanded the study of the hardness of as-quenched steels to a bulk carbon content of nearly 2% which demonstrates the effect of retaining very large amounts of retained austenite upon the as-quenched hardness. Figure 3, from the work of Marder and Krauss [4] shows the relationship between the type of martensite observed and the carbon content and martensite start temperature for Fe-C alloys. Figures 4 to 9 illustrate the appearance by LOM of martensite in steels with increasing carbon content. Figures 4 and 5 show 8115 and 1524 alloy steels after water quenching from 1700°F. They illustrate fully lath martensite matrix structures. Figure 6 shows 1541 which is mostly lath martensite but does have some plate martensite present. Note that as the carbon content of the alloy increases towards the eutectoid carbon content, the correct austenitizing temperature decreases so that it does not greatly exceed the AC3 temperature. Figure 7 shows 10B62, a boron-treated carbon steel (B is used to increase hardenability). It was reportedly austenitized at 1525°F, but the mostly plate martensite structure looks too coarse for that temperature. Compare the apparent coarseness of the structure of the 10B62 to the 1541. Figure 8 shows over-austenitized 1095 carbon steel, austenitized at 1650°F, which dissolved all of the cementite, coarsened the prior-austenite grains and resulted in visible retained austenite. Compare Figure 8 to Figure 7 and to Figure 9. Figure 9 is a W1 water-hardened tool steel at 1.05% C. Note that the martensite, which is all plate, is much finer in appearance and that there is considerable un-dissolved cementite present. Figures 1 and 2 illustrate the detrimental effect of dissolving too much carbon in the austenite, but they only reveal its affect on hardness, not on the retained austenite content and potential service failures.
Plate martensite frequently contains micro-cracks from the impact of one plate into a previously formed plate. These cracks can initiate subsequent failures. Speich and Leslie [5] showed how increasing carbon in the austenite caused the percentage of retained austenite to increase, as well as decrease the Ms and change the martensite type from lath to plate, Figure 10. A number of studies between Payson and Savage in 1944 and Andrews in 1965 have developed empirical formulas to calculate the Ms based upon composition, not simply from the carbon content. Carbon, of course, has the largest effect, but the influence of alloying elements upon lowering the Ms cannot be ignored. The Mf temperature falls with the Ms, so the formulas predict only the Ms temperature.
Detecting Retained Austenite
Over the years, the writer has tried many etchants, plus tint etchants, in an effort to try to preferentially color retained austenite. In almost all case, these efforts have failed. Many years ago, an investigator published a short paper claiming that the addition of 1% zephiran chloride, a wetting agent frequently added to 4% picral to increase the speed of etching [6], would reveal retained austenite by creating a strong contrast between the dark martensite and the un-etched austenite using nital. This author claimed to be able to see and measure by point counting retained austenite down to ~2% in steels. The writer has tried to duplicate this experiment three times, the most recently using railroad cone bearings of carburized 8720 alloy steel. Unfortunately, no details of how these bearings were processed and then prepared for metallography are known. But, at some earlier time, they were analyzed by x-ray diffraction. Three pieces claimed to contain 25.4, 19.7 and 16.2% retained austenite were given to the writer who mounted them in a low-temperature curing epoxy compound and ground and polished them. Nital plus zephiran chloride did reveal the retained austenite much better than nital without the addition and higher amounts of retained austenite were recorded when zephirian chloride was added – but the image analysis results were very low compared to the x-ray diffraction results. Of course, it is possible that some of the retained austenite had isothermally transformed between the time when the XRD work was done and when the image analysis work was done – a time that may have been a few years.
Figure 11 shows the microstructure of the cone bearing that was reported to contain 25.4% retained austenite etched with 4% nital plus 1% zephiran chloride which gave better results than 2% nital. The image, by eye, does not appear to be one-fourth retained austenite and image analysis measured only 13.3% with this etch (and less with 2% nital and two other etchants tried). The specimen with 19.7% retained austenite was measured as 8.5% by image analysis with this etch and the specimen with 16.2% retained austenite was measured as only 1.2% retained austenite by image analysis with this etch. In general, this is the type of difference that the writer has always seen when doing similar experiments previously.
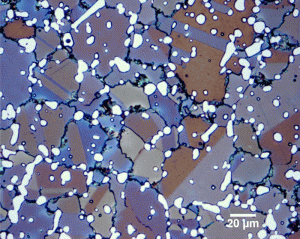
Figure 12 shows an extreme example of over-austenitization where a large amount of carbide was dissolved in D3 tool steel (Fe – 2.0 to 2.35 % C – 11.0 to 13.5 % Cr) which prevented any martensite to form upon quenching. When the retained austenite level is rather high, tint etchants will color the austenite. In this case, annealing twins can be seen in the austenitic matrix.
Conclusions
Martensite is the most important constituent produced by heat treatments designed to produce ideal mechanical properties. Isothermal treatments may sometimes be used to produce lower bainite microstructures which do yield excellent properties while being immune to certain embrittlement problems, such as temper martensite embrittlement, that detrimentally affect tempered martensitic steels. But, hardenability issues limit the ability to use this technology more widely.
The appearance of martensite does vary with the amount of carbon dissolved in the austenite. Examples of lath martensite, lath and plate martensite, plate and lath martensite and plate martensite and retained austenite or plate martensite and cementite microstructures were illustrated. Examples of excessive retained austenite were illustrated. It is the writer’s experience, based upon three experiments using specimens with different austenite contents determined by x-ray diffraction, that retained austenite in steels cannot be observed with the light microscope until the amount is in the range of about 12 to 15%. Retained austenite above this level has only been shown to be helpful to service performance when it is present in the carburized cases of gear teeth. In tool steels, most of which are through hardened, unstable retained austenite leads to a short service life and fracture.
References:
1. L.E. Samuels, Light Microscopy of Carbon Steels, ASM International, Materials Park, OH, 1999, p. 273.
2. G. Krauss, “Martensitic Transformation, Structure and Properties in Hardenable Steels, in Hardenability Concepts with Applications to Steel, D.V. Doane and J.S. Kirkaldy, eds., AIME, Warrendale, PA, 1978, pp. 229-248.
3. A. Litwinchuk et al., J. Material Science, Vol. 11, 1976, p. 1200.
4. G. Krauss, Principles of Heat Treatment of Steel, ASM, Metals Park, OH, 1980, p. 52.
5. G.R. Speich and W.C. Leslie, Met. Trans., Vol. 3, 1972, p. 1043.
6. G.F. Vander Voort, Metallography: Principles and Practice, McGraw-Hill Book Co., NY, 1984; ASM International, Materials Park, OH, 1999.
George Vander Voort has a background in physical, process and mechanical metallurgy and has been performing metallographic studies for 47 years. He is a long-time member of ASTM Committee E-4 on metallography and has published extensively in metallography and failure analysis. He regularly teaches MEI courses for ASM International and is now doing webinars. He is a consultant for Struers Inc. and will be teaching courses soon for them. He can be reached at 1-847-623-7648, EMAIL: georgevandervoort@yahoo.com and through his web site: www.georgevandervoort.com
To View a listing of all George’s articles please click here
Read George Vander Voort’s Biography

