The reflected light microscope is the most commonly used tool for the study of the microstructure of metals. It has long been recognized that the microstructure of metals and alloys has a profound influence on many of their properties. Mechanical properties (strength, toughness, ductility, etc.) are influenced much more than physical properties (many are insensitive to microstructure). The structure of metals and alloys can be viewed at a wide range of levels – macrostructure, microstructure, and ultra-microstructure. Microstructural examination should always begin with the light microscope progressing from low magnifications to higher magnifications, followed by the use of electron instruments, as needed.
In the study of microstructure, the metallographer determines what phases or constituents are present, their relative amounts, and their size, spacing, morphology and arrangement. The microstructure is established based upon the chemical composition of the alloy and the processing steps. A small specimen is cut from a larger mass (for example: a casting, forging, rolled bar, plate, sheet, or wire) for evaluation.
First, the specimen must be polished to a very high luster free from any damage introduced by sectioning, grinding, or polishing. Otherwise, the true structure will not be revealed, and the interpretation will be inaccurate. Specimens are generally viewed in the as-polished condition first using bright field illumination to observe those constituents that have a natural color reflectivity difference from the bulk of the metal. This procedure is commonly used to examine graphite or nonmetallic inclusions and other small particles that might be present; e.g., nitrides, carbonitrides, and borides, or to look for surface oxidation or corrosion and possible cracks. Some other small precipitates that have essentially the same reflectivity as the metal may also be observed if they have a much different hardness and polishing rate than the surrounding metal. They will either stand above or below the matrix phase and can be easily observed particularly if differential interference contrast illumination (DIC) is employed. However, bright field illumination is by far the most commonly used examination mode in metallography.
 |
 |
| a) | b) |
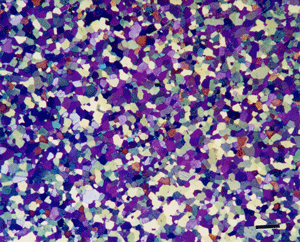 |
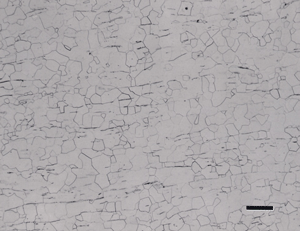
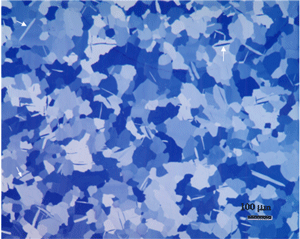
Figure 2: Commercial purity titanium, ASTM F67: A) Grade 4, annealed, etched with Kroll’s reagent does not reveal the grain structure as well as B) F67, Grade 2, as-rolled with as-polished with crossed polarized light (arrows point to mechanical twins); and C) F67, Grade 4, annealed, color etched with modified Weck’s reagent and viewed with polarized light and a sensitive tint filter. |
| c) |
Certain metals and alloys that have non-cubic crystalline atomic structures respond well when viewed with cross-polarized light (i.e., the polarization direction of the polarizer and analyzer are 90° apart to produce extinction). If a metal or alloy with a cubic crystalline structure (such as carbon steel) is viewed with cross-polarized light, the field of view is uniformly dark. No microstructural detail can be observed. However, if a polished specimen of beryllium, cadmium, magnesium, alpha-titanium, uranium, zinc, or zirconium is viewed with crossed-polarized light, the microstructure is vividly revealed.
 |
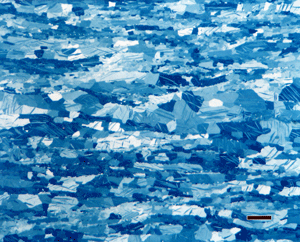 |
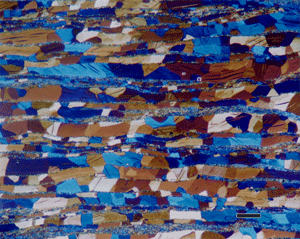
| Figure 3. Microstructure of Zn – 0.1% Ti – 0.1% Cu hot rolled to 6-mm thickness containing mechanical twins (Neumann bands) viewed with polarized light: (Left) after etching with the Palmerton reagent; and (Right) as-polished without etching. Magnification bars are both 50 μm long. | |
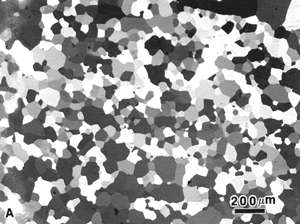
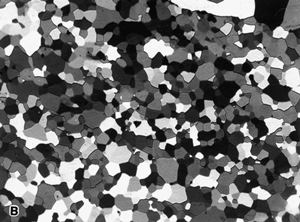
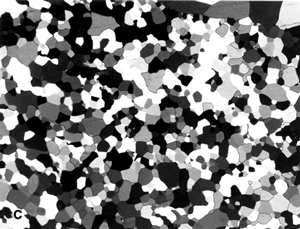
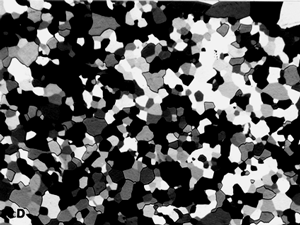
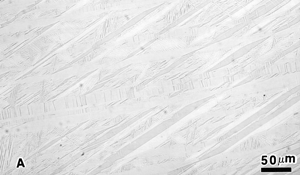
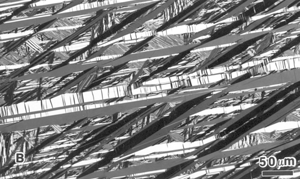
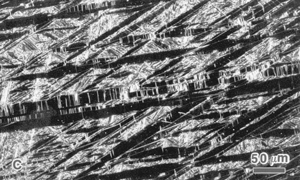
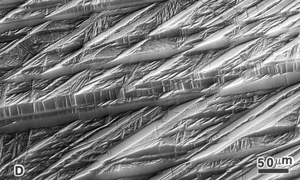
Metallurgical microscopes usually employ synthetic Polaroid sheet filters for both the polarizer and analyzer. The polarizer is generally placed in the light path before the vertical illuminator, while the analyzer is inserted before the eyepieces. Their polarization axes are rotated 90° apart for extinction. Prism polarizers are less commonly used and more expensive but generally produce superior results. Unfortunately, they are not available as an accessory for many metallurgical microscopes. As an example of polarized light examination, Figure 1 shows an as-polished (non-etched) specimen of polycrystalline beryllium viewed with four different polarized light setups. Figure 1a shows the structure viewed using Polaroid filters (in the crossed position) for both polarizer and analyzer. The image is flat and devoid of color (all images are shown here in black and white). Figure 1b was obtained by placing a Berek prism pre-polarizer (to pre-polarize the light) before the Polaroid filter polarizer. The image is much better but was nearly devoid of color. Figure 1c was obtained by the use of an Ahrens prism polarizer in place of a Polaroid filter polarizer. Again, the image is crisp with good contrast, but it was weakly colored. Figure 1d shows the results obtained using the Ahrens prism polarizer and the Berek prism pre-polarizer. It is excellent with good color development (although all are shown here in black and white). A Leitz Orthoplan mineralogical microscope was used for this work.
Some of the metals that respond to polarized light can also be etched and will reveal the microstructure in polarized light. In general, the microstructure often is revealed better with crossed-polarized light examination of an as-polished, non-etched specimen than after etching and viewing with bright field. Figure 2 shows the structure of CP Ti revealed by etching with Kroll’s reagent and viewed with bright field compared to as-polished CP Ti viewed with crossed polarized light. But, Figure 2c shows CP Ti color etched with modified Weck’s reagent and viewed with polarized light plus a sensitive tint filter which produced even better results.
 |
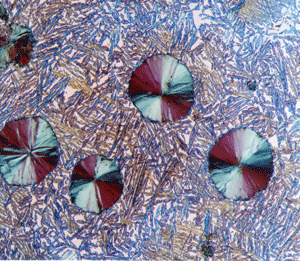 |
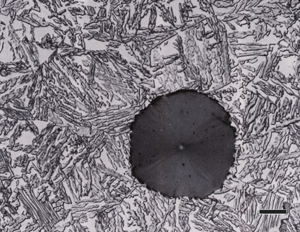
| Figure 4. Microstructure of austempered ductile iron (Left) etched with 10% aqueous sodium metabisulfite and viewed (1000X) with bright field illumination; and, (Right) etched with Beraha’s CdS reagent and viewed with crossed polarized light (500X). |
|
Polarized light of etched specimens can provide better results than when an as-polished specimen is examined. Figure 3 demonstrates this using a hot worked Zn – 0.1% Ti – 0.1% Cu specimen. Figure 3a shows the segregated wrought structure containing mechanical twins (the lenticular bands within the α-Zn elongated grains) viewed with polarized light after etching with the Palmerton reagent. In comparison, Figure 3b shows the microstructure revealed using crossed-polarized light examination of a non-etched specimen. Both reveal the grain structure and mechanical twinning, but the etched polarized light image is much more dramatic and reveals the banded deformed eutectic constituent much better.
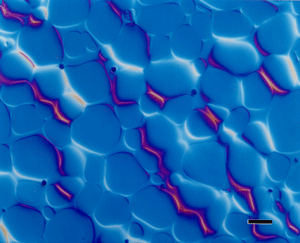 |
| Figure 5. Microstructure of as-polished tungsten heavy-metal alloy (W – 7% Ni – 3% Fe) viewed with differential interference contrast illumination. The magnification bar is 50 μm long. |
Crossed-polarized light has limited usage in metallography because many metals and alloys have cubic crystal structures. However, some second phases may be non-cubic and will respond nicely to polarized light. Nodular graphite in ductile cast iron is commonly studied using crossed-polarized light because the growth pattern of the graphite is vividly revealed. Figure 4 shows nodular graphite in austempered ductile iron etched with aqueous 10% sodium metabisulfite and viewed with bright field and a similar ADI specimen color etched with Beraha’s CdS reagent and viewed with polarized light to reveal the growth pattern within the graphite nodules.
In some cases, etched metals with a cubic crystal structure can be examined beneficially with cross-polarized light. Tint etched specimens are often viewed in this way generally with a sensitive tint plate inserted in the light path to enhance color effects. Some structures etched with ordinary chemical etchants respond nicely to polarized light. For example, fine pearlite in steels or other fine lamellar eutectic or eutectoid structures respond to polarized light, although this may not reveal anything not already observed.
Although incident bright field illumination is by far the most common illumination mode (except for those who work exclusively with metals like Be, U, Cd, Zr, etc.) used by metallographers, increased use is being made of DIC illumination. The Nomarski system is most commonly used to produce DIC. It brings out height differences that might not be observed at all with bright field. Many years ago, height differences were revealed using oblique illumination. However, this method yields uneven illumination across the field and degrades resolution. Nomarski DIC can reveal features not visible in bright field – not by increasing resolution but improving image contrast. Figure 5 demonstrates the use of DIC in the examination of a tungsten heavy-metal alloy (W-7%Ni-3%Fe) which was not etched.
 |
 |
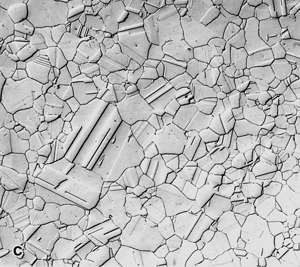 |
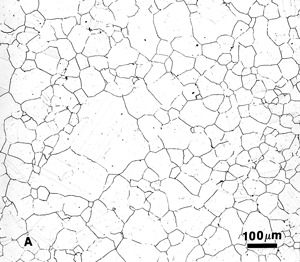
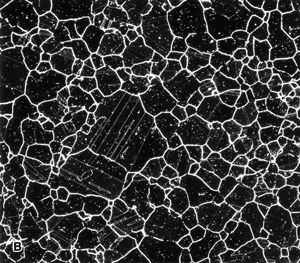
Figure 6. Austenitic grain structure of Waspaloy, a nickel-based superalloy, etched with glyceregia and viewed with: A) bright field; b) dark field; and, C) Nomarski differential interference contrast. |
Metallographers infrequently use dark field illumination. Only a few phases are best examined with darkfield. In copper alloys such as tough pitch copper, the copper oxide phase lights up vividly (deep red) when viewed with dark field, but the copper sulfide phase does not. With bright field illumination, both phases look rather alike with a light blue color.
Dark field, as with DIC, may reveal features not visible with bright field illumination. Dark field and DIC both generate improved image contrast for many microstructures. The self-luminous effect produced by dark field offers increased resolution and visibility over bright field. Dark field collects the light that is scattered by roughness, cracks, pits, etch steps, or “ditches”, etc. Hence, it is quite useful in the study of grain structures. Figure 6 shows the grain structure of Waspaloy, a nickel-based superalloy, in the solution annealed and double-aged heat treatment condition after etching with glyceregia. Figure 6a shows the structure viewed with bright field revealing a partially developed grain structure (the dark lines) and some faint annealing twins (the fainter parallel lines or bands within the grains). Figure 6b shows the same area viewed with dark field illumination. Basically, the contrast is reversed, but all of the grain and twin boundaries are much more clearly revealed. Also, we see some coarse precipitates within the grains (the fine, white dots). Figure 6c shows the same area examined with DIC which reveals the grain structure well. This shows how the etchant has produced selective dissolution to reveal the structure.
 |
 |
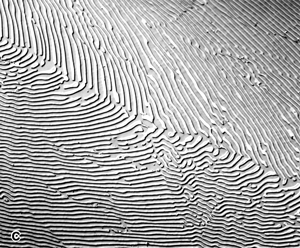 |
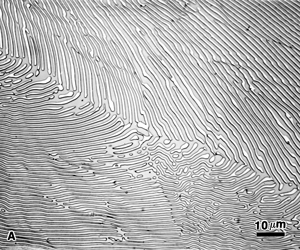
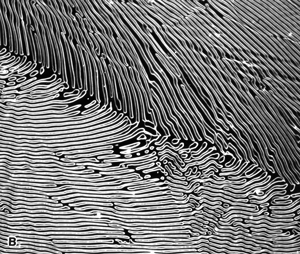
Figure 7. The α-copper/copper phosphide lamellar eutectic structure in Cu – 8.4% P binary alloy (as-cast) after etching and viewed with: A) bright field; B) dark field; and, C) Nomarski differential interference contrast. |
Figure 7 shows the microstructure of the α-Cu/Cu3P eutectic in a copper – 8.4 wt. % phosphorus binary alloy. The specimen was etched with an equeous solution containing ammonium persulfate and ammonium hydroxide. This is a fine lamellar eutectic which is resolvable at high magnification (1000X used). Figure 7a shows the etched structure viewed with bright field illumination. Figure 7b shows the same area with dark field. Note how all of the copper phosphide lamellae appear to be outlined with bright light, and the Cu lamellae between the Cu3P lamellae are black. This very strong contrast makes the structure easy to see, and an interlamellar spacing measurement would be simple to perform. Figure 7c shows the DIC image of this area. It is quite clear from this image that the etchant has dissolved the Cu phase leaving the Cu3P lamellae in relief above the matrix.
As a final example of the benefit of using alternate illumination modes, Figure 8 shows the microstructure of aluminum bronze (Cu – 11.8 wt. % Al) water quenched from the all β phase field to form martensite. This structure, in this alloy, is actually rather difficult to clearly reveal by etching and is revealed best using an as-polished specimen viewed with crossed-polarized light. Figure 8a shows the image viewed with bright field. Because it was not etched, the structure is not clearly revealed. In this case, polishing has produced some relief so that the bright field image (with the aperture stopped down) does contain some information. Figure 8b shows that crossed-polarized light produced a vivid, bold presentation of the martensite. Because of the surface relief, both dark field (Figure 8c) and DIC (Figure 8d) revealed the martensite phase, although not as well as polarized light.
In conclusion, knowledge of the crystal structure of the metals or alloys studied, and also second phases that might respond to polarized light, as well as relative hardness differences between constituents, can provide guidance to whether or not examination with dark field, polarized light or Nomarski DIC may produce better results than bright field. Most color etchants, if the color in bright field is not vivid, can be enhanced using polarized light plus a sensitive tint filter (this filter usually is detrimental to polarized light images of non-cubic metals in the as-polished condition). If the etched results in bright field seem to be inadequate, try these other illumination mechanisms. It is not always possible to predict which may help the most.
George Vander Voort has a background in physical, process and mechanical metallurgy and has been performing metallographic studies for 48 years. He is a long-time member of ASTM Committee E-4 on metallography and has published extensively in metallography and failure analysis. He regularly teaches MEI courses for ASM International and is now doing webinars. He is a consultant for Struers Inc. and will be teaching courses soon for them. He can be reached at 1-847-623-7648, EMAIL: georgevandervoort@yahoo.com and through his web site: www.georgevandervoort.com
To View a listing of all George’s articles please click here
Read George Vander Voort’s Biography

