 |
The microstructure of iron-base alloys is very complicated and diverse, being influenced by chemical composition, material homogeneity, processing and section size. This article offers a brief explanation of the terminology describing the constituents in ferrous alloys, and offers a basic review of steel microstructures.
Microstructures of castings look different from those of wrought products, even if they have the same chemical composition and are given the same heat treatment. In general, it is easiest to identify heat-treated structures after transformation and before tempering. For example, if a mixed microstructure of bainite and martensite is formed during quenching, these constituents will become more difficult to identify reliably as the tempering temperature used for the product increases toward the lower critical temperature. Further, ferrous metallographers tend to use nital almost exclusively for etching, but nital is not always the best reagent to use to properly reveal all microstructures. Picral is an excellent etchant for revealing certain micro-structural constituents in steel, but the use of picral is prohibited by some companies because picric acid can be made to explode under certain conditions. However, picral-related accidents are less common than for nital. Vilella’s reagent, which also contains picric acid, is exceptionally valuable for certain compositions and microstructures.
 |
Because of misuse and confusion regarding certain terms, there is a need to discuss the terminology describing the constituents in ferrous alloys. Certain terms, such as sorbite and troostite, were dropped from the metallographic lexicon in 1937 because they referred to microstructural constituents inaccurately. However, such terms still are occasionally used. The term phase often is used incorrectly in reference to mixtures of two phases, such as pearlite or bainite. A phase is a homogeneous, physically distinct substance. Martensite is a phase when formed by quenching but becomes a constituent after tempering as in decomposes from body centered tetragonal (bct) martensite to body centered cubic (bcc) ferrite and cementite. Definitions will be given in this article in the process of describing and illustrating various phases and constituents in ferrous alloys.
SPECIMEN PREPARATION
 |
| Table 1 |
Ferrous metals must be properly prepared to observe their microstructures. Many view this task as a trivial exercise, yet its proper execution is critical to successful interpretation. The first step in the process is to select the test locations to be sampled. The specimens selected must be representative of the lot; this is critical if the interpretation is to be valid for the part or lot being evaluated. The plane of polish may be oriented in different directions relative to the piece being sampled. For example, for a casting, the test plane may be perpendicular or parallel to the solidification axis and may be located anywhere between the surface (where solidification begins) and the center (where solidification ends). In a small casting, the structure will not vary greatly over the cross section. However, this is not the case for large castings. Also, the use of a separately cast keel block (a block of metal from which test coupons are taken) for test evaluations may be highly misleading, as its solidification characteristics may be quite different from that of the casting.
Wrought alloys are sampled in a similar manner, using either longitudinally or transversely oriented cutting planes, which may be taken in any location from the surface to the center. The mid-radius location is often selected as being representative of the overall condition, which may be true in many cases. Additional processing alters the microstructure, usually producing greater homogeneity and finer structures. But, problems still can arise.
Sectioning is almost always required to obtain a test piece of the proper size and orientation for metallographic examination. An abrasive cutoff saw is the most commonly used device for sectioning, producing a good surface having minimal damage when the proper blade is used with adequate coolant. More aggressive sectioning methods often are used in production operations. These produce greater damage to the structure that must subsequently be removed if the true structure is to be revealed.
 |
| Table 2 |
After obtaining a specimen, it may be mounted in a polymeric material to facilitate handling, to simplify preparation, to enhance edge retention, and for ease of identification of the specimen (by scribing identification information on the material). Mounting may be done in a press using a thermosetting or thermoplastic resin or with castable resins that do not require external heat and pressure for polymerization.
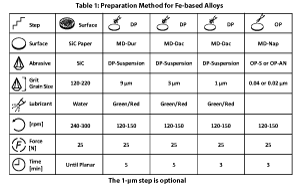
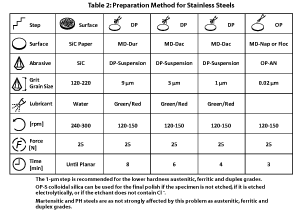
The use of automation in specimen preparation has grown enormously over the past twenty-five years. Automated devices produce better results than can be achieved manually. They yield more consistent results, better flatness and better edge retention, and offer greater productivity. Many procedures for successfully preparing ferrous specimens could be listed; there is no one correct procedure. Some methods favor certain types of specimens or problems. There also are many different products that give successful results. Tables 1 and 2 list procedures that can be used to prepare most steel specimens. These methods give consistent results with good specimen edge retention. For the most difficult specimens, a 1-µm diamond step can be added after the 3-µm diamond step, using the same materials, speeds and direction, but somewhat less time. Other variations are possible depending on particular needs and specimens.
The first step, often called planar grinding, can be done using several products. Traditional silicon-carbide (SiC) paper always is satisfactory, and aluminum-oxide (Al2O3) paper also may be used. The process should always start using the finest possible abrasive that can remove the damage from cutting and get all of the specimens in the holder co-planar in a reasonable time. SiC paper does have a short life. Continuing to grind after the paper has lost its cutting efficiency will generate heat and damage the specimen. Grinding surfaces with fixed diamond abrasive were introduced more than fifty years ago, but these used electroless nickel to bond the diamond to a metallic substrate. These disks were extremely aggressive and could only be used with very high hardness materials, such as sintered carbides and ceramics. In more recent years, disks with polymeric surfaces were introduced, called “rigid grinding disks” where diamond of different size could be sprayed onto the surface for coarse and intermediate grinding. These were less aggressive, but had high removal rates and long life, but did produce a rough surface with considerable depth of damage. Later, fixed diamond disks using resin bonding were introduced and these were less aggressive than those where electroless nickel was the bonding agent. They have higher removal rates than a cloth with the same diamond size, and had good life, but produced more damage than the cloth and a rougher surface. But, these resin-bonded diamond disks can be used for a wider range of materials than the earlier electroless-Ni bonded diamond disks and do provide excellent flatness. When the material to be ground is somewhat delicate and low in strength or hardness, SiC is a better choice for grinding.
ETCHANTS
A steel specimen that is to be examined for inclusions or nitrides should not be etched. To see the other microstructural constituents, etching is needed. Nital (usually 2%) is most commonly used. It is excellent for revealing the structure of martensite, and also is very good for revealing ferrite in a martensite matrix and to bring out ferrite grain boundaries in low-carbon steels. Picral, on the other hand, is better for revealing the cementite in ferritic alloys and the structure of ferrite-cementite constituents, pearlite and bainite. Nital and picral both dissolve ferrite but nital’s dissolution rate is a function of crystal orientation, while picral’s rate is uniform. Other reagents have specific uses, especially when dealing with higher alloy grades, such as tool steels and stainless steels, or when trying to selectively reveal certain constituents or prior-austenite grain boundaries. Etchants for steels are listed in many standard text books (1) and handbooks, and in ASTM E 407.
MICROSTRUCTURES
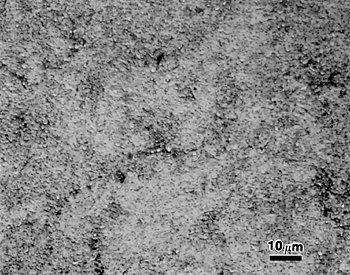
Alpha iron, strictly speaking, refers only to the bcc form of pure iron, which is stable below 912°C (1674°F) while ferrite is a solid solution of one or more elements in bcc iron. Often these terms are used synonymously, which is incorrect. Ferrite may precipitate from austenite in acicular form under certain cooling conditions. Acicular means the shape is needle-like in three dimensions. However, this is not the actual shape of acicular ferrite in three dimensions. Figure 1 shows the appearance of ferrite grains in a carbon steel used for motor laminations. There are also ferritic stainless steels, which contain high chromium contents and very little carbon. Ferrite is a very soft, ductile phase, although it loses its toughness below some critical temperature.
Gamma iron, as with alpha iron, pertains to only the face-centered cubic (fcc) form of pure iron that is stable between 912 and 1394°C (1674 and 2541°F) while austenite is a solid solution of one or more elements in fcc iron. Again, these terms are often used interchangeably, which is incorrect. For heat-treatable steels, austenite is the parent phase for all transformation products that make ferrous alloys so versatile and useful commercially. Austenite is not stable at room temperature in ordinary steels. In chrome-nickel (Cr-Ni) steels, know as stainless steels, there is a family of very important grades where austenite is stable at room temperature.
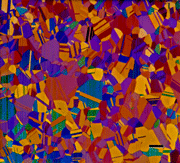
Figure 2 shows an example of the microstructure of AISI type 316 austenitic stainless steel. Austenite is a soft, ductile phase that can be work hardened to high strength levels, particularly in the fully austenitic Hadfield manganese steels.
In high-carbon, high-alloy steels, such as tool steels, use of an excessively high austenitizing temperature will depress the temperatures where martensite begins and completes its transformation. These martensite start and end temperatures are depressed to such an extent that the austenite is not fully converted to martensite during quenching and the remaining austenite, called retained austenite, is present (but not necessarily stable) at room temperature.
Figure 3 shows an example of retained austenite in the carburized case of AISI type 8620 low-alloy alloy steel. The retained austenite is white and lies between the plate martensite “needles.” However, there are also a few white particles of cementite in the micrograph (arrows). Excessive retained austenite in tool steels usually is detrimental to die life, because it may transform to fresh martensite and cause cracking in the die, or reduce die wear resistance. In the case of a carburized gear tooth, retained austenite usually is not detrimental because the gear teeth typically are not shock loaded, so the retained austenite would not transform to martensite and the toughness of the austenite, when stabilized, could be beneficial. There are grades of stainless steel where the composition is balanced to produce approximately equal amounts of ferrite and austenite at room temperature as shown in Fig. 4
Figure 4 shows the microstructure of such a stainless steel.
Delta iron is the bcc form of pure iron that is stable above 1394°C (2541°F) to the melting point, 1538°C (2800°F), while delta ferrite is the stable high-temperature solid solution of one or more elements in bcc iron. Delta ferrite may be observed in as-cast austenitic stainless steels (it is put into solution after hot working and solution annealing), in some precipitation hardened stainless steels (for example, 17-4 PH) when the composition is not balanced to avoid it, in some martensitic stainless steels and in some tool steels. Delta ferrite usually is considered detrimental to transverse toughness when it is present in a hardened structure.
Figure 5 illustrates delta-ferrite stringers (longitudinal plane) in AM350 precipitation hardenable stainless steel.
Carbon in iron exists either as graphite or as cementite. Graphite is the stable form of carbon in iron (mainly observed in cast iron), while cementite is metastable and can transform to graphite under long-term, high-temperature exposure. Cementite is a compound of iron and carbon with the approximate formula Fe3C and has an orthorhombic crystal structure. Some substitution of other carbide forming elements, such as manganese and chromium, is possible. Therefore, it is more general to refer to the formula as M3C, where M stands for metal. Only small amounts of the various carbide forming elements can be substituted before alloy carbides of other crystal structures and formulae are formed.
Figure 6 shows cementite in white cast iron. The carbon content of cementite is 6.67 wt%, which usually is the terminus for the iron-carbon (Fe-C) phase diagram. Cementite is hard but brittle (about 800 HV, or Vickers hardness, for pure Fe3C, and up to about 1400 HV for highly alloyed M3C).
Carbon and alloy steels are in the austenitic condition when they are hot worked. Subsequent cooling results in the transformation of austenite to other phases or constituents. If a carbon or low-alloy steel is air cooled after hot rolling, a diffusion-controlled transformation occurs where ferrite first precipitates, followed by pearlite. Pearlite is a metastable lamellar (plate-like) aggregate of ferrite and cementite that forms at temperatures below the lower critical temperature (the temperature where austenite starts forming from ferrite upon heating). With time and temperature, the cementite in the pearlite will become spheroidized; that is, it changes from a lamellar to a spheroidal shape. This reduces the strength and hardness of the material, while increasing its ductility. The degree of change is a function of the carbon content of the alloy. Pearlite forms by a eutectoidal reaction. A eutectoid transformation is an isothermal, reversible reaction in which a solid solution (austenite) is converted into two intimately mixed solid phases, ferrite and cementite. All eutectoidal products are lamellar, even in nonferrous systems.
For steels having carbon contents below the eutectoidal value (0.77% carbon), ferrite precipitates before the eutectoidal transformation and is called proeutectoid ferrite.
Figure 7 shows proeutectoid ferrite and lamellar pearlite in a piece of plate steel from the ship RMS Nomadic, a tender for the RMS Titanic. The ferrite is white and the pearlite is dark because the lamellae are much too finely spaced to be resolved at the 200X magnification in Figure 7.
Figure 8 shows coarse pearlite in a fully annealed specimen of AISI type 4140 alloy steel where the lamellae can be resolved. The cementite lamellae appear dark while the ferrite remains white.
In steels having carbon contents above the eutectoidal composition, cementite will precipitate in the grain boundaries before the eutectoid reaction occurs and is called proeutectoid cementite. Pearlite increases the strength of carbon steels. Refining the interlamellar spacing also increases the strength, and toughness, as well. In a slowly cooled specimen, the amount of pearlite increases to 100% as the carbon content increases to the eutectoidal carbon content. The hardness of a fully pearlitic eutectoidal steel varies with the interlamellar spacing from about 250 to 600 HV for the finest spacings. Pearlite can be cold drawn (cold worked) to exceptionally high tensile strengths, as in piano wire, which also has considerable ductility.
If the cooling rate is faster than that achieved by air cooling, or if alloying elements are added to the steel to increase hardenability, a different two-phase constituent may be observed, called bainite. Bainite is a metastable aggregate of ferrite and cementite, which forms from austenite at temperatures below where pearlite forms and above the temperature where martensite starts to form. The appearance of bainite changes with the transformation temperature, being called “feathery” in appearance at high temperatures and “acicular” at low transformation temperatures. The feathery appearance of “upper” bainite also is also influenced by carbon content and is common in grades having high carbon contents. The term acicular is not a perfect description of the shape of “lower” bainite.
Figures 9 and 10 show the appearance of upper and lower bainite, respectively, in partially transformed AISI type 5160 alloy steel specimens.
 |
|
Fig. 13. Soft, carbon-free martensite in low-residual 18Ni250 maraging steel; 500X, modified Fry’s reagent etch
|
If the cooling rate from the austenitizing temperature is rapid enough (a function of section size, hardenability and quench medium), martensite will form. Martensite is a generic term for the body-centered tetragonal phase that forms by diffusionless transformation and the parent and product phases have the same composition and a specific crystallographic relationship. Martensite can be formed in alloys where the solute atoms occupy interstitial sites, such as carbon in iron, producing substantial hardening and a highly strained, brittle condition. However, in carbon-free alloys having high nickel contents, such as maraging steels, the solute atoms (Ni) can occupy substitutional sites, producing martensites that are soft and ductile. In carbon-containing steels, the appearance of the martensite changes with carbon in the interstitial sites. Low-carbon steels produce lath martensite, while high-carbon steels produce plate martensite (often incorrectly called “acicular” martensite) when all of the carbon is dissolved into the austenite.
Lath martensite is shown in Figure 11 (see Figure 3 for plate martensite).
When quenched from the proper temperature, so that the correct amount of cementite is dissolved (see discussion following) and the grain size is quite fine, martensite will appear virtually featureless by light microscopy, as shown in Figure 12 for AISI type 52100 bearing steel.
Figure 13, for comparison, shows the structure of martensite in nearly carbon-free 18Ni250 maraging steel.
The strength and hardness of martensite varies linearly with percent carbon in austenite up to about 0.5% C. As the carbon in the austenite increases beyond 0.5%, the curve starts to flatten and then goes downward due to the inability to convert the austenite fully to martensite (the amount of retained austenite increases). Therefore, when high-carbon steels are heat treated, the austenitizing temperature is selected to dissolve no more than about 0.6% C into the austenite.
There are other minor constituents in steels, such as nonmetallic inclusions, nitrides, carbonitrides, and intermetallic phases, such as sigma and chi phases. Nonmetallic inclusions are of two types: those that arise from the restricted solubility of oxygen and sulfur in the solid phase compared with the liquid; and those that come from outside sources, such as refractories in contact with the melt. The former are called indigenous and the later are called exogenous. Many poor terms are used in reference to inclusions. Nitrides and carbonitrides result when certain nitride forming elements are present in adequate quantities, aluminum, titanium, niobium, and zirconium, for example. A certain amount of nitrogen always is present in the melt and this varies with the melting procedure used. Electric-furnace steels usually have around 100 ppm (parts per million) nitrogen while basic oxygen-furnace steels have about 60 ppm nitrogen. Aluminum nitride is extremely fine and can be seen only after careful extraction replica work using transmission electron microscopy (TEM). The other nitrides often are visible in the light microscope, although submicroscopic size nitrides can also be present. Sigma and chi phases (not shown in this article) can be produced in certain stainless steels after high temperature exposure.
SUMMARY
The microstructure of ferrous alloys is very complicated and this review has only touched the surface of knowledge about steel microstructures. It is a basic tenet of physical metallurgy that composition and processing establishes the microstructure, and that microstructure influences most properties and service behavior. To maintain control of the quality of steel products and to diagnose problems in processing, testing, or service, the microstructure must be identified and, in some cases, quantified. This can only be accomplished when the metallographer can properly distinguish the phases or constituents present, which depends on proper specimen preparation and etching.
References
1. G.F. Vander Voort, Metallography: Principles and Practice, ASM International, Materials Park, OH, 1999.
George Vander Voort has a background in physical, process and mechanical metallurgy and has been performing metallographic studies for 43 years. He is a long-time member of ASTM Committee E-4 on metallography and has published extensively in metallography and failure analysis. He regularly teaches MEI courses for ASM International and is now doing webinars. He is a consultant for Struers Inc. and will be teaching courses soon for them. He can be reached at 1-847-623-7648, georgevandervoort@yahoo.com and through his web site: www.georgevandervoort.com
To View a listing of all George’s articles please click here
Read George Vander Voort‘s Biography


